Welcome!
Back in the day (10+ years ago!) I created this free tutorial for my readers and it’s become one of my TOP TEN most popular projects!
I hope you enjoy this “Vintage Betz White” tutorial and consider becoming one of my email list subscribers!
>>>join my email list<<< for fresh new content, freebies, discounts, sneak peeks and other goodies!

I woke up this morning with an image in my head of a felt snowflake. So I asked my kids to make a few traditional fold and cut paper snowflakes for me before they left for school. I wanted to use them as templates for my idea. Instead, my 10 yr old showed me a 3D paper snowflake they had made in his art class. I loved the beauty and simplicity of it, so I changed my course! After some quick google research, I’ve found that apparently this particular 3D Paper Snowflake is quite prevalent on the internet. (there is even a 3D Paper Snowflake Flickr Group!) I made a few prototype attempts, applying the 3D Paper Snowflake Tutorial to felt and came to the following conclusion…

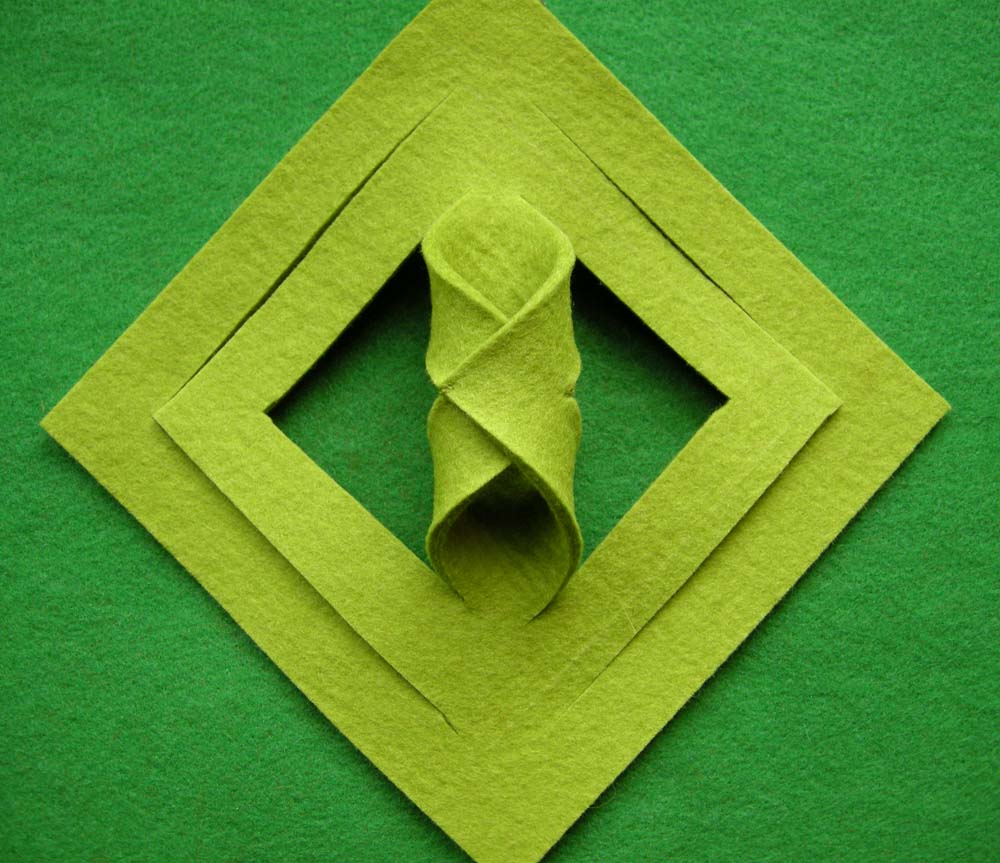
…it worked! I am in love with the curves and the “Ogee” shape of this design. It amazes me that it is created from a square and a few straight cuts. The original paper snowflake is made up of 6 of these shapes, each becoming one “arm” of the snowflake. I decided to stop at just one shape. The following design uses a thick 3mm 100% wool felt. I had been saving this piece for just the right project, and this was it!

Step 1: Cut one 6″x 6″ square of felt. (For a piece this large, the felt needs to be pretty stiff, such as this 3mm wool felt. A 2mm thick felt would also work well, but I suggest decreasing the overall scale of the design for better stability.) Mark lines 3/4″ apart, parallel to the perimeter, using a chalk liner pen. Mark a line diagonally across the square from corner to corner.

Step 2: Using a straight edge and an Xacto knife, cut along the first line from the corner to about 1/4″ from the diagonal line. Make 2-3 passes with the blade, cutting a little at a time and keeping even pressure on the straight edge so that the felt does not creep while being cut.

Repeat until all cuts have been made, keeping the felt intact at each corner on the diagonal line. Chalk lines can be brushed away.

Step 3: Lift the corners of the center square and hand stitch the ends together with matching thread. Secure and cut the thread, hiding the knot between layers.
Step 4: Turn the piece over and lift the corners of the second square. Overlap the points and stitch together at each point.
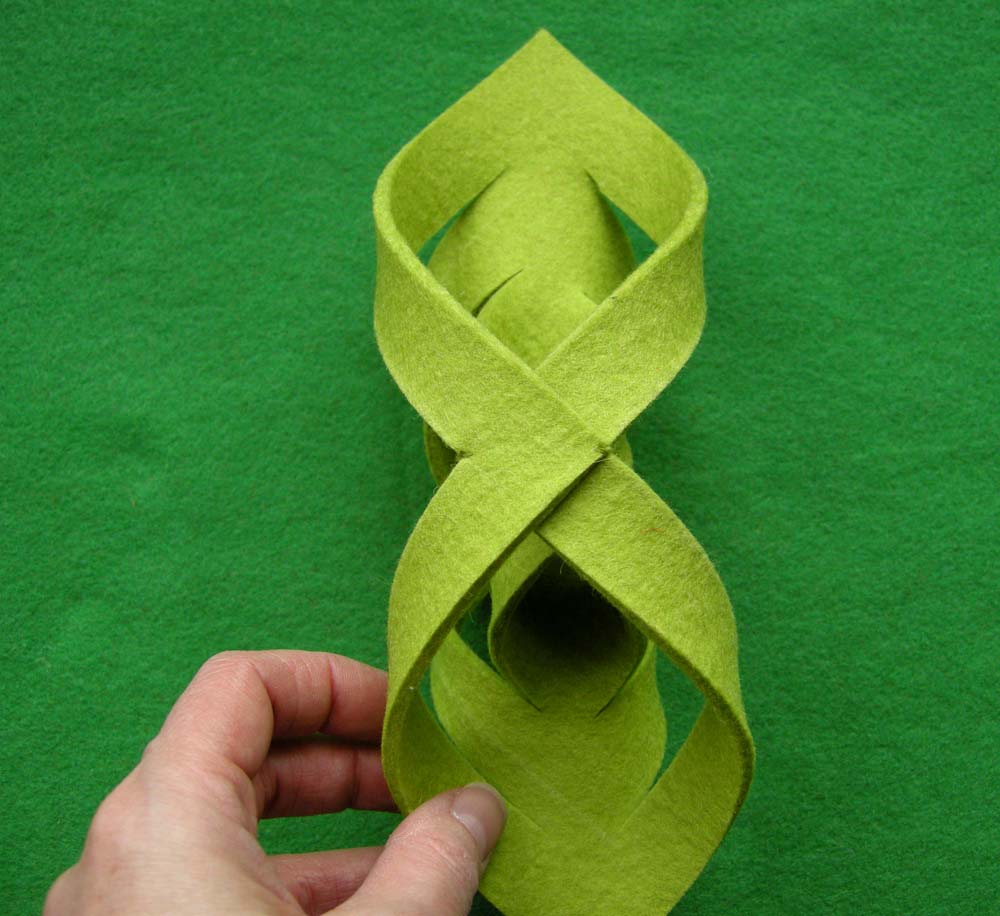
Step 5: Continue turning the piece over, overlapping points and stitching until all 4 squares are stitched.

Step 6: Create a hanging loop at one end with a clear monofilament thread. I added a few felt balls (natch) to mine.

This makes a large ornament, about 10″ in total length. I hung it in our big kitchen window, but was unable to take any good shots of it today as it was too gloomy for nice photography.

I also experimented with 3″ squares of wool blend felt (thinner) and marking the cut lines 1/4″ apart. I was able to use Fabric-Tac glue instead of hand stitching the corners. This felt was not rigid enough to hold the shape of the 6 piece snowflake when I tried to put several of them together. So, I opted to string them together vertically.
Felt projects inspired by paper projects is a natural. They don’t always translate, but the result can be surprising, evolving into something new altogether. Like, have you seen these felt bows? Even my ol’ pomander rosettes *grew* out of a paper project!
Did you enjoy this “Vintage Betz White” tutorial? I’d like to encourage you to >>>join my email list<<< for fresh new content, freebies, discounts, sneak peeks and other goodies!
These are absolutely sensational. Stunning! A couple of other thoughts. 1. How cute are your boys to oblige your early morning request? Adorable.
2. I love your comment about paper projects translating to felt. This is very intriguing to me.
Thank you for inspiration. Felt is something I think about daily. Love all of your information.
Kindly,
Jen
It’s safe to say that I waited all day for this tute! I’m not disappointed… your translation of this type of flake into felt is gorgeous and totally brilliant!
These are simply beautiful! Thanks for sharing!
Gah! Stop, your killing me. I peek here and now have to find time to make me one for my kitchen window too! I made rosette ornaments last year. Thank You for taking time to post this. Happy Holidays!
I just travelled for 14 straight hours but when I saw you had a new tutorial I simply had to see it since everything you post and craft is so so awsome. thanks so much!!
The felt is beautiful and I love it! Also, I am thinking that this would be a great ornament idea to do with my kids using the sheet foam… you know there is even the glittery kind. Thanks for the tutorial!
Very lovely, I made a version with metalic paper are very nice for the holidays.
Hugs.
http://blog.maluaral.cjb.net/2007/12/11/kirigami-y-mis-detalles-especiales
You had me going all day on twitter! These are simply lovely. One of the best homemade ornaments ever.
Eheeee! OH, how I love tutorials. And this one is amazing! I love it! Leave it to kids to enspire us, right?
Thanks for sharing!
Betz, you continue to amaze me, I just love this!
very beatiful…
Oh my goodness, I have to make some of these immediately, beautiful yet so simple. That’s for posting this 🙂
Very Beautiful! I’ve not done anything with felt, but you may have just got me motivated!
I Love this tutorial so much..
It’s easy to make and yet so cute looking..I think I’m going to make ove for my chinese new year decoration..very soon.
Thanks again for sharing..
Big fan of the ogee shape – and an even bigger fan of something that stops me in my tracks for a moment of complete admiration. Love it!!!
Cool beans! Love it.
Very, very nice! I love how modern and sleek it looks.
These are gorgeous. I have one of those paper snowflakes hanging up all year- my son made it a number of years ago and it’s just so pretty. These are really lovely. I’m still intrigued by your original idea though…
Your brainstorms + skills x {determination + energy} = magnificent.
So pretty!
Really lovely, Betz. I’ve always loved these snowflakes, but minimizing it to the one section was a flash of brilliance. Felt has the added bonus of making it seem all cozy and winter-y too.
These are great! I am a 3rd grade teacher in Saudi Arabia. These would be great to make with my students! But probably with paper so they can use scissors! Don’t want any knives around!
I’m going to make myself some for my apt. for Christmas. It’s the only decorations I will see!
Thanks!
wow! I can’t wait to try this out! thanks so much for last minute gifts!
Hello,
This is fabulous!
~ Gabriela ~
Wow, this is terrific! Thank you.
I had to write to say how sorry I was to have missed your book signing at Fibre Space in Alexandria–I found out only days in advance and couldn’t line up a babysitter. I checked out all the blogs of the women who attended your class and you can tell they had a great time!
aren’t these addictive? I found that tutorial when I was putting together our advent calendar and like you have been making single units but out of the paper that is used up in our advent calendar. Each day a new ornament is added to our hanging garland so we aren’t left with an empty spot (in fact, today I posted a pic of the progress).
These ornaments look great!
Brilliant & beautiful!
Wow, love this! Must try!
All I can say is: “WOW”. This is absolutely beautiful, subtle and sweet! Thanks for even more inspiration (I´m already a big fan of the felt flower tutorial!)
Feliz Navidad!
http://www.handmadeconamor.blogspot.com
Clau
These are amazing! My 11-year-old just came home with the same 3D snowflake out of paper. So cool. Love the felt, too.
So beautiful! Thank you for sharing it with us.
this project just jumped to the top of my to do list. i love the clean modern lines. thanks
Wonderful! Thanks for sharing the tutorial. I’ll be running off to make one of my own now. 😉
You know, I saw the title for this post, and wasn’t quite sure what to expect, but this shape is so awesome–makes your mouth go in an “O!” involuntarily with its simplicity and modern lines. I’m just jumping into recycled felt, and always looking for fresh ways to use it–this is so inspiring!
Wow! That is so cool, and the idea is now whirling around in my brain as I try to think of other applications. Thanks for sharing.
I’ve been looking for something fun and easy to give out this year. Do you think I could get a few of these done over the weekend?
Beautiful!
Kristen,
Absolutely!
This is fabulous Betz, thanks for sharing!
Love this, so gorgeous! Thanks for another great project!
Love the idea, it inspired me to make my own. Though my material of choice was green soda bottle plastic. http://sirmamabear.blogspot.com/2009/12/ogee-ornament.html
I have a lot of felted wool sweaters I am using for other projects so decided to use a piece of one. Turned out very cute. I’ll continue to experiment with the different weights. I love using materials I already have for multiple projects. Thanks!
These are beautiful! I was wanting to make felt ornaments that will be safe for my toddler if he gets to them & I LOVE these. I’m glad soulemama linked to it.
Merry Christmas!
Wow Amazing. I can’t wait to make one!
Ok, I was thrilled with my crafts for the holidays and feeling very complete – until I saw this lovely idea! What clear and detailed instructions too!
Here us what came out of my workshop: http://sono-ma.blogspot.com/2009/12/taking-moment-to-enjoy-hand-made.html
Maybe this will be next?
This is brilliant! I will be going out to buy some felt on my lunch break and giving it a go! Seeing as i haven;t even had a chance to put the xmas tree up yet i think tonight might be quite the festive spirited evening!
Absolutely gorgeous, and not just for xmas, it makes a perfect hanging decoration all year round!
THANK YOU!!
I linked this tutorial on my blog. So pretty and modern. It’s going to be a whole year before I can use these but Im sure they can be appropriate decoration for another holiday. I’ll keep you posted if I figure that out.
Cheers!
~Valiant V
What a beautiful ornament!
Oh those are beautiful and so creative!
Long time follower but have never commented. 🙂
You produce beautiful things!
Thx A lot. This is great tutorial. Great help. Keep on with this style of tutorial(I like the tuts wich have a general and particular use like this one here). It goes deep into real production.
This is a fantastic tutorial! I saw some of the administrative staff at my old university make these for the office, but I haven’t thought about them in a while. Seeing these inspires me to make a mobile for my friend’s soon-to-be-born baby!! Can’t wait. Thanks for sharing.
wonderful!!
Fantastic! I didn’t know what to do with the thick felt piece that my sister has bought for me by mistake. Thank you for this great tutorial!
Love it! And I love how your son inspired you.S o sweet!!!
Amazing !!
Thank you 🙂
How cute is that?!
You make it look so simple, but yet it is very elegant. Thank you! 🙂
hey i made some of these using pieces of foam that come in sheets.. and some electric fence wire with two beads and a small hole punch… anna
This tutorial is stunning! I decided to feature it in my Christmas Ornament Roundup!
This is awesomely classic!!!
🙂
love it totally!!!
C’est ravissant
Merci beaucoup
I just finished 2 of these ornaments 🙂 Thank you for a simple, easy & beautiful handmade gift idea! Looking forward to adding beads in the morning. Great stuff!
I came here through a link from a craft blog because I recognized your ornament as part of a paper star I like to make. Imagine my surprise to see that you are an author I recognize — I just renewed Warm Fuzzies from the library a few days ago! 🙂 As an origamist for the last few decades, it’s very intriguing to think about those models as felt projects.
Absolutely F.A.B.U.L.O.U.S !!
That is a fantastic looking ornament and kinda simple to make. Thank you for sharing.
Absolutely gorgeous.
adorable n very creative d’-‘b
I’ve been making these out of paper for years, but never thought to make them out of felt! Thank for the inspiration! 🙂
Hay – I have a friend who loves “wacky” ear rings … on a smaller scale could do this for holiday ear rings. Have not tried but do not see why it would not work if the material was thin enough! Comments welcomed. Grandma Sharon
I am a paper artist so I will be trying this with some of my paper squares. I could alternate kusudama flowers with your delightful design. maybe that would be spectacular? I think I have just added another idea, thanks to you, to the 1001 other ideas on my list. This one goes at the top … #1! Karen
Swoon! I’m going to make tons of these for my staircase! Thanks sooo much for the inspiration!
always-a-project.com
These are really pretty. They’d be lovely strung together as a mobile for a baby shower gift.
its amazing and wonderful tutorial
Wow that looks so lovely! 🙂 Truly inspired!
you are one smart and talented lady, thanks for sharing. cant wait to try it myself.
Wondering how this might work with two different fabrics fused together with a WonderUnder fusible web type product? May try this.
WAUW ONBESCHRIJFELIJK MOOI
HOE JE VAN IETS EENVOUDIGS IETS ZEER MOOI KAN MAKEN MET EEN BEETJE TALENT EN HANDIGHEID
zeer zeer mooi
lieve groetjes
Hello!
here are mine made with your help:
http://www.chickpea-studio.com/chickpea_sewing_studio/2012/12/felt-ogee-in-the-making.html
thank you so much!
they are hugely popular!
juju
I just made one with 2 different colors of glitter felt which I fused together with Pellon Wonder- Web which made the felt thicker and the two colors looked great.
Thank you very much! Amazing