Have you been practicing your Lettuce Edge Technique that I demonstrated in the last post? Now’s your chance to put your skills to work! I present to you the Scarf-to-Shrug Tutorial!

Here we go!
1) Take your “wingspan” measurement. Using a tape measure, measure from your wrist to the center back of your neck. You’ll want to keep your arm down at your side and have the measuring tape travel up the outside of your arm across your shoulder to the back of your neck. I measured about 31″. This will be half of your wingspan and half the length of your scarf.
2) Take your “cross-back” measurement. Measure yourself underarm to underarm with the measuring tape going straight across your shoulder blades. I measured about 22″. This will be the size of the opening in the scarf to shrug-ify it.
3) Cut 2 rectangles of jersey fabric 14″ wide by the length of half your wingspan measurement from Step 1. (ie: 14″W x 31″L) You’ll want to be sure that the width of your rectangle is cut with the stretch and the length is cut with the grain (parallel with the selvedge). If you’re not sure why this is important, you can review the Lettuce Edge tutorial.
4) Seam the 2 rectangles together with a 1/4″ lapped seam. Do this by overlapping the ends of the rectangles by 1/4″. Pin then sew with a larger zigzag stitch, taking care not to stretch the fabric as you sew. This will make a nice flat seam at the center/back of your scarf/shrug. See Diagram A, below.
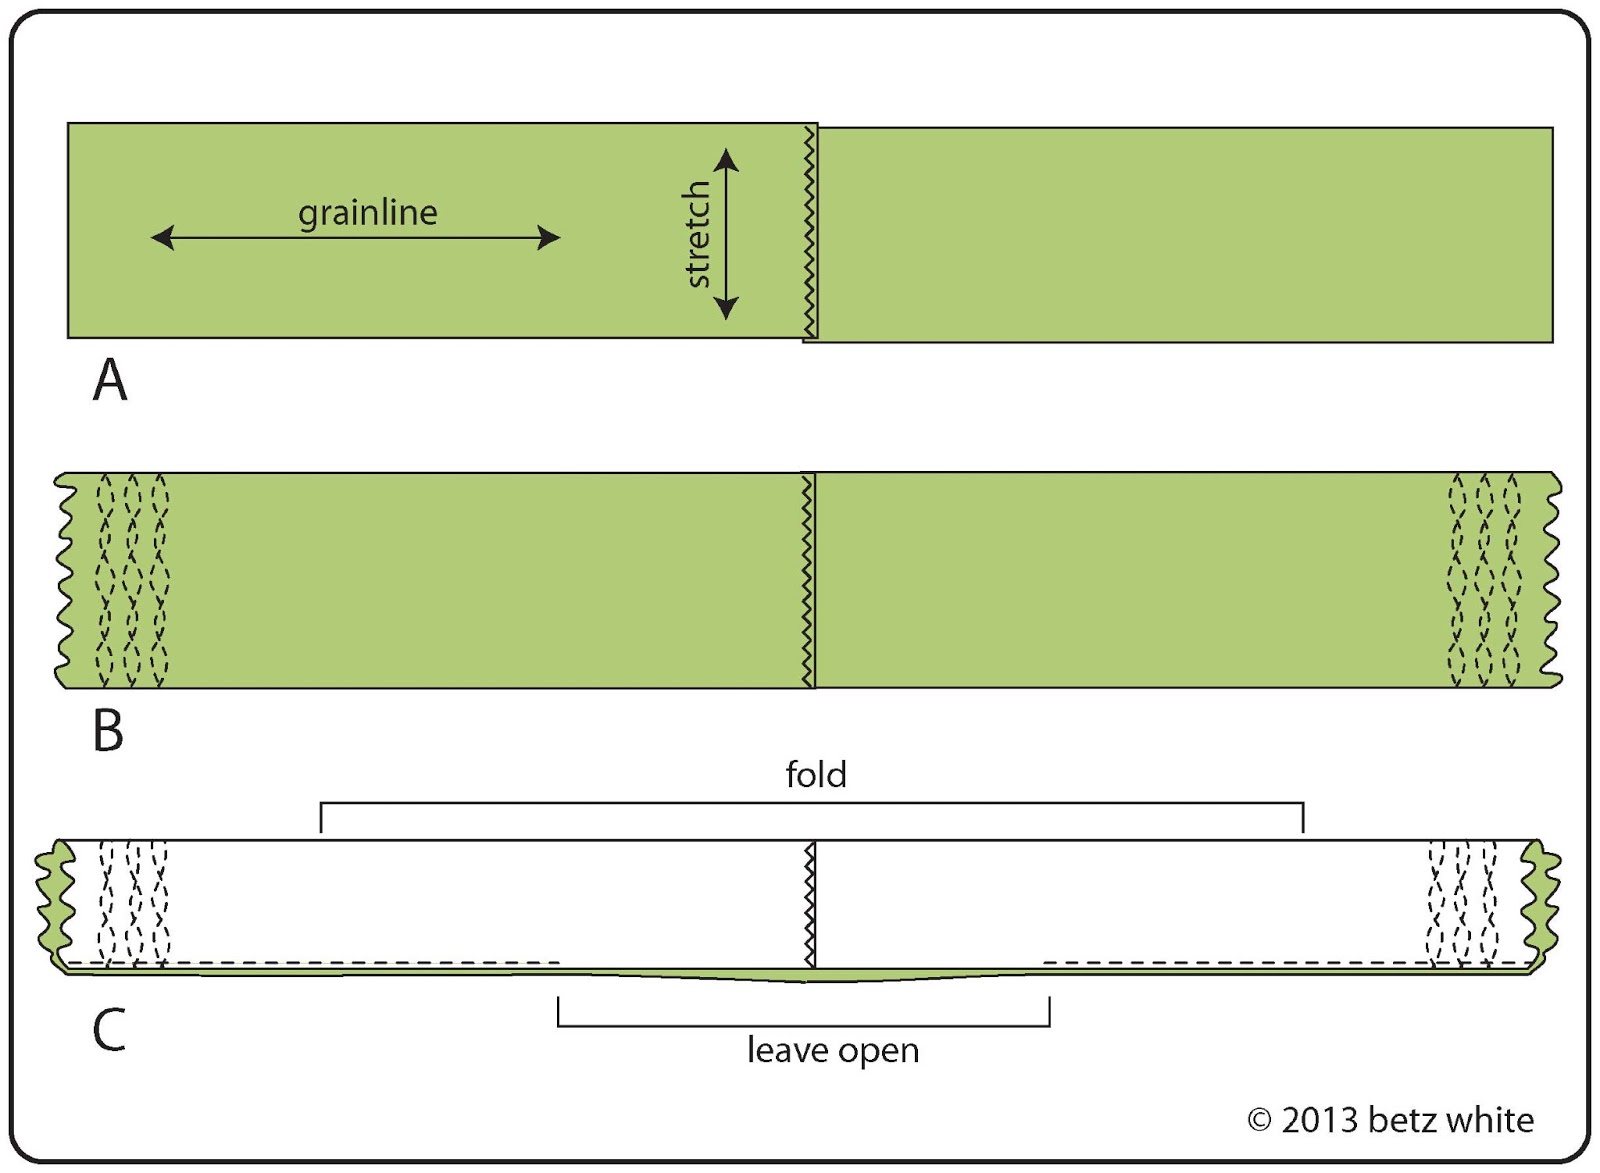 |
| click on image to see bigger |
5) Next, create a lettuce edge and scribble stitching detail at either end of the scarf, referring to my tutorial. See Diagram B, above. You can make as many rows of this as you’d like.
6) Fold the scarf lengthwise, right sides together, aligning the raw edges. Pin, then sew with a 1/4″ seam allowance, leaving an opening in the seam equal to your “cross-back” measurement from Step 2. You can divide this measurement by 2, then measure that distance from the lapped seam (ie: 22″ ÷ 2 = 11″ from the seam). See Diagram C, above. Be sure to back stitch at the beginning of each seam.
7) Turn the scarf/shrug right side out and you’re done! The raw edges around the opening won’t fray and the jersey will naturally curl in just a bit so you don’t have to worry about finishing those edges. To wear it as a shrug, simply put your arms into that center opening and into the “sleeves”.
Because of the way this is cut with the grain of the fabric, I specified a one yard length in the materials list. You will only be using about half the width of the fabric, so you should have enough material to make 2 of these from one yard of jersey. Perfect! You can make a second one as a gift. Maybe for Mother’s Day!
I hope you enjoyed this tutorial. Let me know if you have any questions!
This is so cool! Thank you for sharing. I have TONS OF old tshirts from hubby that are XL; should be enough to make at least 1 shrug from a shirt; if not, I can use contrasting colors to make it a two-different-colored-sleeve shrug 🙂
Great idea! You can piece the scarf in thirds, maybe, and leave the center third open. Sounds like fun!
Hi Betz,
I have just read your brilliant idea, sitting here with a light weight scarf around my neck. I took the scarf off and folded it as you mentioned in the tutorial – hey presto I’m now off to set it. Thanks for sharing this great idea.
Ha! Perfect! Too funny…
What a great idea 🙂
I wonder if I can convince my picky 6yo that this is a way to keep her shoulders out of the sun?
WOW!! Snoopy Dance! I know now what to do with the scarves that were gifts from close friends! They are too beautiful to just give away. But I haven’t known how to wear them in hot Florida! Woo-HOO! I’m gonna make some shrugs! THANK YOU!!
I love the shrug idea! But what I really want to know is where you bought that great shirt. 🙂 Or did you make it, and if so, would you have happened to place a tutorial online? Love it. 🙂
The shirt was Max Studio, I bought it at Marshalls a few years ago!
Another request for infos on the neat shirt…
…and more love for the shrug!
See comment above!
Neat, thanks!
Found an orange one of those shirts on Ebay. Fingers crossed, hoping a medium fits!
Now, off to find a jersey knit to go with this (very bright) orange…
I’ve been looking for a solution to hide bingo arms/batwings; I’m working out, but that’s going to take time! Do you think this would work with wovens/non-knits? If so, I wonder if a thin elastic across the top open edge would keep it from slipping. Any thoughts? Thx!
I haven’t tried it with a woven, so I’m not sure. You may not need the elastic. You’ll have to hem the cuffs though because the lettuce edging won’t work really on the woven. Good luck!