I’ve been doing a little experimenting with a new needle felting tool. I thought I’d whip up a little tutorial on a technique I came up with.

This is the Clover needle felting mat and tool. Needle felting is usually done into a block of foam. This mat is like a stiff brush with a hard plastic base. It’s really nice to felt into because the work is easy to remove. Plus there are no bits of foam to get stuck in your work.
The tool has a spring loaded plastic guard around the needles that retracts into the handle as you punch into the work. It is a safety feature to prevent poking your fingers (although I still managed to inflict a bit of acupuncture). The handle also stops the needles from hitting the hard base. (NEVER use regular felting needles with this base as they are too long and will break)

First, lay some wool fiber across the base in one direction.
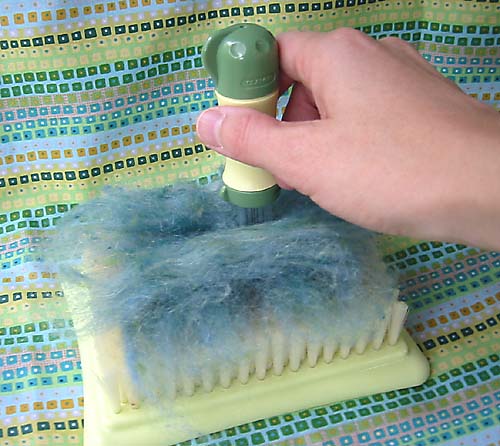
Next, layer more wool on top of the first, crossing directions. Start to felt by gently punching with the tool. Keep the tool vertical to prevent breaking the needles.

Now the fiber has matted together.
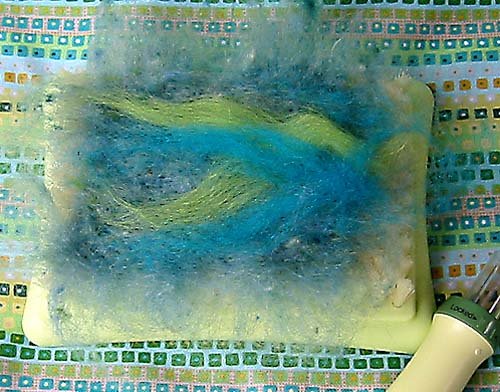
I decided to add some color variation by laying thin wisps of wool on top.

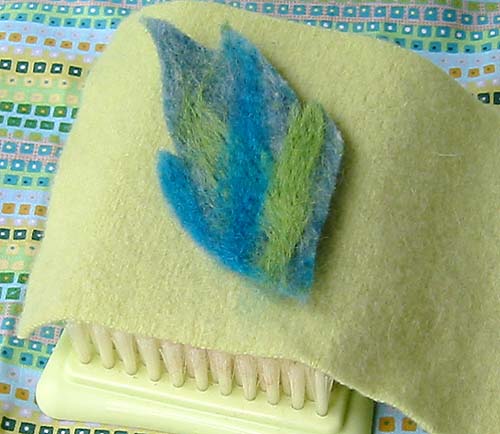
Punch into place. Carefully lift work from mat.

I cut a simple leaf patten out of paper. Now, this part may offend traditional needle felters…I am going to cut a shape out of this peice of felt. There is probably some rule out there that says you’re not supposed to cut wool fibers…but please bear with me!
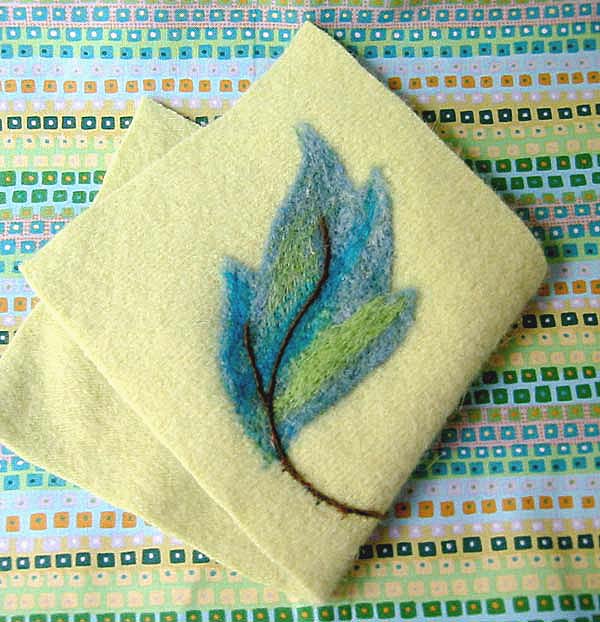
The cut leaf! I placed the shape onto my base fabric that I’d like to “applique” it to.
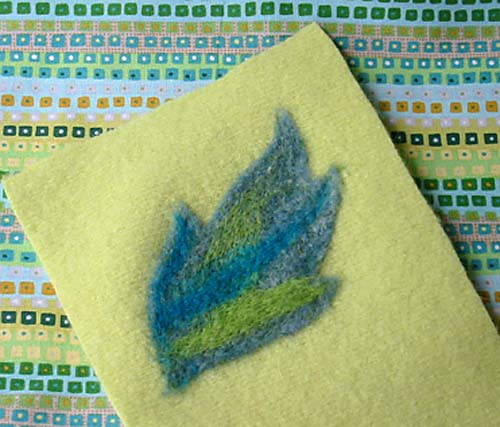
Start punching around the shape, securing the edges first. Continue until it is fully attached and has “become one” with the base fabric.

Yarn added for the veins and stem.

Back view: This shows how much fiber has come to the back of the base fabric.
The technique I used produced a firm, dense motif. Typically with needle felting, fiber is laid directly onto the base fabric and punched into place. Making the shape first, as seen above, allows a little more experimentation. I can make several motifs the same size and move them around until I am happy with the composition.
For another point of view, check out this tutorial that uses a more traditional technique. Please let me know if you have any other decorative needle felting tutorials you’ve found helpful! Find basic instructions for using the Clover tools at their website(link no longer active). I’d love to hear from anyone else that has tried them.
Thank you for this post.. I have never seen this done before..nor am I even remotely familiar with felting. I love the look of it..The leaf against the fabric background is so lovely.
Great idea– you got me thinkin’…
Very interesting! I do some needle felting with the needles and the foam and forming it into the shape you want,but this seems it would be faster for non-dimensional pieces (I do berries and things). I’ll have to look for these tools and try it out! Thanks!
Really love it! I was wondering how the Clover tools worked — I’ve only used foam and individual needles which is kind of scary. And your technique is great. I posted about your tutorial over at whip-up.
Great tutorial!
I started needlefelting with exactly that Clover tool this spring and had much fun with it since then. Very easy and safe. For doing very tiny appliques I prefer single needles though, easier to work precisely with them.
Wonderful tutorial! I like having new possibilities when it come to felting projects.
GREAT tutorial, thank you for sharing this. I was wondering about the new tools, too. (And the important tip about NOT using regular needles with the bruch/mat.)
Love this tutorial.Thanks,Betz!
How fascinating, thank you for sharing. I love the step by step guide and the end result is lovely!
Wow thanks for the tutorial! I have been looking on getting into needle felting lately.
I’ve been needlefelting for about a year now, starting with individual needles for embellishment of felted/fulled sweaters and moving to 3-d sculptural needlefelting and a multi-needle punch. I got the clover punch about 6 months ago and love it. I’ve recently acquired a needlefelting machine, so my process is evolving but I did all of the embellishment on the garment in this post using the clover tool and a hand held single needle to tack things down. (I’m now dreaming of a Baby Lock Embellisher. I’ve used the display Embellisher in my favorite fiber shop with good results but it will be a while before I can save up enough money to buy one for myself.)
I love your technique of creating the loosely felted shape on its own and then attaching it to the base fabric. I’ve done something similar on a couple of small projects using shapes that I loosely felted inside a cookie cutter and then felted onto my project. Using that technique, I didn’t have to cut the fibers.
My one concern with the clover brush mat is that I worry that it doesn’t have enough surface area for the motifs that I’m working with. Do you do any larger designs?
hello , this is the first time i have even been on this sight, but not the first time i have seen felting, i have seen it on diy nad in a country living magazine there is a pumpkin that is felted and that is why i am writing to you. i would very much like to learn how, but can find noooooooo one that seems to know how, or maybe i am looking in the wrong places. i am very much interested in learning how to make dolls and that pumpkin, it really caught my eye. i sure hope you can help me. i would appreciate it if you would e-mail me at [email protected], my name is karyl pronounced carol, and i love to do crafts and sew sew sew, i think i like crafts because they don’t have to be perfect and i am not a perfect seamstress. hope to hear from you soon. thank you, karyl
Hey, Betz fans– I just got my Clover needle felting tool today & have a tip I want to share with anyone who might find it useful. I was stingy & didn’t buy the special brush mat, because I already had a big hunk of foam I use for single-needle felting. Turns out it doesn’t work so well with the Clover punch, because it compresses the foam so much. So I looked around my desk for something else to use and, aha! A ball of scrap wool I’d been meaning to dye, but don’t mind ruining. It’s a double-handful-sized ball of yarn, & it’s perfect (so far, with very limited trials). Firm enough to support the work, and actually a very handy size/shape to hold. Now, this is only handy for quite small appliques, because it’s a curved surface, of course, but the Clover mats aren’t that big anyway… and this was free. 🙂 Hope this helps someone else! (Mind, too, this _will_ ruin the ball of yarn, or at least felt its outside layers together interestingly.)
This is late, but I just discovered your great blog and creativity! I got the felting needle and mat today! Had to share how great and easy it is. Thanks so much for sharing your creativity throughout your site and your tutorial for this prompted me to try it!
WOW!!! I have never heard or have ever seen this until now. Where do you get the tools for this? I can see a lot of uses for this in my art. You make it look so easy to do. Thank you so much for sharing your talent with us.
Lori Roberts
http://www.picturetrail.com/homePage/stampin_granny
WOW!! I have never heard or seen this before. I love it and you make it look so easy. Is it? I have two left thumbs. LOL! Thank you for sharing your talent. Now I know I must try this out!
Oh my this is totally awsome, I need to try this, Its been on my to do list, And now its being moved up to the top of my list.. Gone shoping .. LOL Rose THANKS SO MUCH for this lesson.
thanks, i finally decided to take the plunge, i ordered some wool and just made a mutant rainbow…but now i am going to try and make a little heart for my hubby.
I love this, and I can’t wait to try the technique after I finish my crochet and knitting projects :). Lots of possibilities with this. Thank you!
You are the best! I totally love this technique. I’m running off to see what I can do with it. Thanks for sharing…
The Clover tool can be used with many different sizes of needles (36, 38, 40, 42) – just be sure you’re purchasing 3 inch long needles, not the 3.5″ needles.
REQUEST this info from your supplier: Size, style and length. Don’t purchase as ‘Pink’ or “Green’, or thick/short/narrow, etc. That doesn’t give you any info on where the barbs are placed, how many there are, the thickness of the needle’s shaft, etc…There are dozens of different sizes & styles available; I carry 8 Foster needles that fill the range of needs.
You can also fill from 1 – 5 needle positions in the Clover tool; it’s not necessary to have 5 in place.
The more you attach, the more resistance the needles will meet (and energy used) to penetrate the fiber and background material. But the more fiber you can push through the background, the stronger the bond will be to keep your fiber attached.
Any brush would work – the Clover ‘mat’ is far too small to work on IMO. You can fasten/clamp/glue any number of brushes together to make a larger felting surface: garage floor brooms, cleaning brushes, etc. As you’re pushing more fiber through a background surface, the brush tips just allow the needles more freedom to pass into empty space than into foam rubber. That’s its only advantage.
Using an embroidery hoop (reversed or upside-down in placement on fabric) larger than your design and needling into foam is just as easy and it keeps the background taut w/o puckering.
I have posted much basic NFing info on my evolving website; please visit for free instructions into beginner’s NFing.
That is too cool! Thanks for posting how you use the mat, etc. 🙂
Thanks for your tutotial…I doubt if I can find these in Denmark but I needed to find a good explanation on how to felt and yours is excellent! I have felted two small projects without instructions just to try it out and they went OK…one of them is up on my blog if you are curious.
Thank you very much for your tutorial…I just brought a Clover felting tool the other day and after a bit of trial and error, I came looking for some easy info to get me on the right track..
Thanks again.. I shall atempt it again!!
Thank you for this! I’m new to needle felting and your idea is really interesting and clever – needle felting with a ‘twist’! I’m going to try this.
Best wishes..Bernie
Thanks for a great blog! I’m new, to needle felting, as well, but I’m sure hooked! I had seen this tool for sale on EBay and wondered how it worked. Thanks for the info!
Bettina
Thank you!! I’ve been using my washing machine to felt (full) my knitted projects and have been fascinated w/the needle felting process. I have all the tools and roving, but just haven’t done it yet. I’d like to embellish my felted bags, but am typically an scaredy cat. You have shown me the way!!! Thanks so very much. Can’t wait to get another bag done so I can experiment!
hey betz! i have a bit of an idiotic question. where do you get (dyed) wool fiber? i’ve made your teacup pincushions by following the video from martha stewart, but i’d love to try needle felting. i live in new york city, where there really aren’t many craft stores, so should i be ordering fiber from online craft stores or ebay?
would you reccomend this clover felting tool for a 7 year old who loves to craft or is it too dangerous
Hi Anon.
I guess it would depend on the 7 year old. I would not let mine do it! The needles are wicked and need full attention.
Betz
That is really pretty, I can’t wait to have a go at this technique 😀
Hi I have been using the same technique, but with a sponge worksurface to make the ears for my animals. As it is easier to get them nice and thin for realism.
Great minds and all that 😀
mini hugs Juliet
oh I am having a giggle at myself here because I have only been felting a very short time and been doing it that way all along…great minds think alike 🙂
Huh – I never thought to create a square to cut a shape from. How clever! I’m dying to try this now!
Great tutorial. Thanks for sharing.
Thanks so much for this info on needlefelting. I just purchased these tools and tried them out a couple of days ago — and I have a problem. I wanted to make a snowman sculpture with some wool roving given to me so I made a loose ball and started punching away — and it worked for a minute or two but since then it seems that it is not felting (just jabbing in and out of the roving). Have I killed my needles already??? They do not seem to be bent or binding in any way but they just don’t seem to be pulling the fibres together anymore. Any wisdom will be appreciated.
Kathy
Hi Kathy,
I wouldn’t imagine that the needles would be shot already. It’s hard for me to know what is going on there. Maybe the needles are too fine? They come in different gauges. I would just keep at it or try some larger needles perhaps. Sorry, I know I’m not much help!
Betz
Thanks for your reply, Betz — I will see about some replacement needles in a larger size and see if that works. It is a bit of a mystery because it worked well initially then just stopped doing the felting — all the needles couldn’t have dulled down at the same time (and in such a short time). I’ll keep trying as I would really like to utilize some needle felting in my fibre art work. Your blog is wonderful and particularly the photos. Thanks KK
Could your fibre be non-felting wool fibre? It doesn’t really account for it felting in the first place – perhaps it will allow a certain amount of compression – but it sounds to me like your wool is simply not felting together, and that sounds more like the fibre than the needle to me. Even a fine needle will felt a large surface, just takes longer.
I had never heard about non-felting wool, until I was trying to make a hat, and it warned me that some natural colored wool yarns wouldn’t felt. Mine Didn’t! Rats!
I have too just discovered this wonderful tool. I really appreciate reading your tutorial, because it made the tool make much more sense to an amateur like me. That is fabulous. I immediately pulled out the wool and tried a similar project(different design), and it was just fabulous how the result turned out.
Again, I really appreciate your green articles on crafts and look forward to more.
This is an excellent needle felting tool, I use this regular, some excellent felting ideas on your blog, I will visit again, goodluck with the felting projects.