
Dare I say I have my act together? The following is the tutorial promised for the “cutie pies” I posted last week.

MATERIALS
- Felted wool sweater – If you don’t know how to felt a sweater, see this former post.
- Wool felt
- Steam-a-Seam double sided fusible web
- Felt balls – I bought these, but they are easy to make yourself.
- Needle and yarn

Cut a circle out of the Steam-a-Seam (mine is 7″ diameter). Peel off paper from one side and fuse to the solid wool felt, following product directions. ***(1/3/07 UPDATE: Please note, I corrected a mistake in this post. The diameter I used was 7″, not 6″ as orginally posted. Sorry!)

Cut the solid felt out around the edge of the Steam-a-Seam. Remove remaining paper.
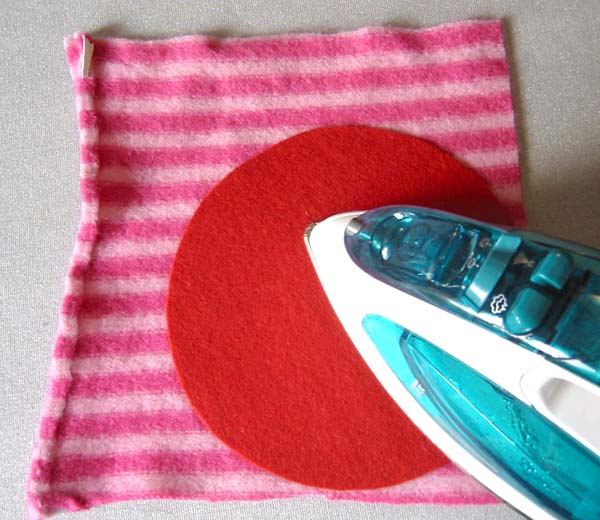
Place fusible side face down onto wrong side of sweater felt. Fuse and trim out circle. Be sure your work is totally fused around the edges so it doesn’t de-laminate once your start bending it around. I like to cover it with a damp press cloth and go back at it with a lot of steam.
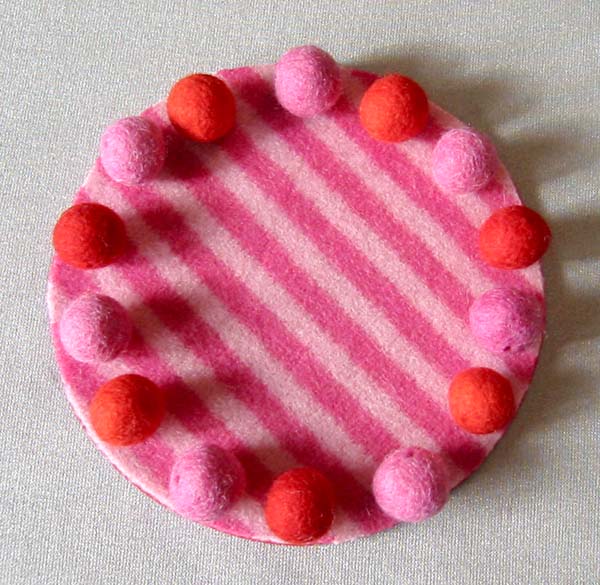
Make a sundial…no, wait, just kidding. Place your felt balls around the perimeter to get a feel for how many you’ll need. I used 14. There’s is probably some kind of “pie-R-squared” formula to calculate # of balls based on circumference, but that’s just not my style…
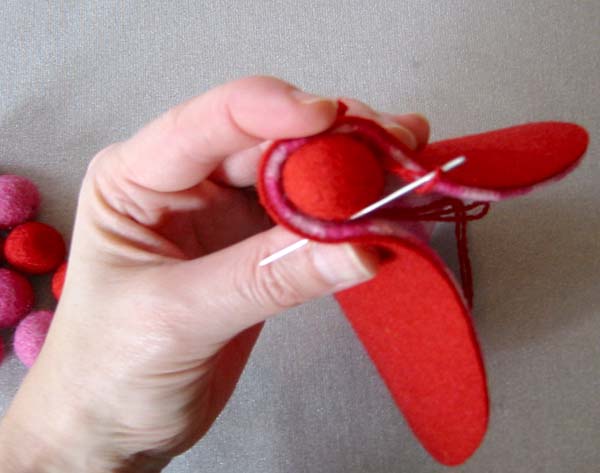
Thread a needle with yarn, double stranded for strength. Start to sew through the felt circle, through the ball, then back through the felt again. I started about 1/4″ from the top edge of the felt and went through the center of each ball so that the tops of the balls would peek out a little.

Keep going making sure that the felt wraps about half way around each ball. Keep adding balls, alternating sides of the felt circle.
 Stop and check about halfway around the circle, making sure you have used half the balls from your “sundial” estimate. Scientific, I know…

Keep going around until you’re back at the beginning. When you’re happy with the look, knot the yarn in an inconspicuous place. This one took me 2 tries to get it to space out right, but it went pretty fast regardless. Felt is pretty forgiving as long as you don’t expect it to be perfectly uniform!
I think these would look really fun with various size felt balls or beads as well. Do me a favor and send me your photos if you make some cutie pies of your own!
Thanks for the tutorial. These are so very cute!
Thanks, Betz! These are going on my short list of things to try next!
Sara
wonderful !!! many thanks for this tutorial …
As soon as I get my hands on some felt balls, I’m going to try this! Thank you for this great tutorial!
This is darling! Thank you.
Wonderfull
I am going top try
Loriane
Amazing tutorial!Thanks!!
This is so beautiful, cute and unique. You are amazing and SO creative, love it!
This is gorgeous! Thanks so much for the tutorial!
Guuh, so cute! I have lots of felt scraps from making sweaters into scarves too. This is going to make adorable holiday presents. Thanks!
Thank you so much for the tutorial! This will be such a cheerful gift for my MIL. My kids can help me with the felting…. What a great idea!
What a wonderful tutorial!
I love it ! very nice !
No speak english!!!. Super el paso a paso del proyecto.
Thanks!!
Thanks yo for the tutorial. I´ll to try this work, my first work in felt.
From Spain.
Guaaauuuu!!!
So beatiful, thanks, you are the best!!!!
Love it!
this is totaly adorable, thanks for sharing:)
Thank you for your wonderful tutorial!
I made one, and you could see the picture on my blog. Sorry, but I wrote it in Japanese. I will translate it to English in my English blog later:-)
stephanie,
This is the most creative tutorial ive seen yet especially for a teen. Once i get some felt balls its all over!:^)
You inspire creativity and originality! Thank you
This is the most creative tutorial ive seen yet especially for teen. Once i get felt balls I will try this project! You inspire creativity and originality. Thank you.
Really beautiful
What a cool idea! Thanks for sharing 🙂
adorable. I couldn’t get to the sweater felting link. Could you report the link? I’m ready to felt some of my favorite old sweaters….
gREAT! i lOVED IT! i’LL TRYED TO DO!
Que bonito, amei.
bjs da avó Margarida
thanks for the freebie. I love the cupcakes and coffee mugs.. Keep up the good work. Amy
Hello^^ This tutorial is fantastic – all your blog is fantastic and beautiful – and I made a cutie-pie, you could see the photo of the work in my blog.
hi.. do u selling those felt balls..?
I loved!!!
Thnak You : )
Carine Calé
http://feltroaholic.blogspot.com
merci c est genial comment faire pour s abonner a la new
Gracias por compartir el tutorial, esta lindo, saludos desde México.
Genial!!!!