Here’s a quick little project that is great for using up scraps of felted wool. If you’re a regular visitor here, you know that I felt a lot of recycled sweaters for my work. Atleast 80% wool. Wash it. Shrink it. Cut it up.
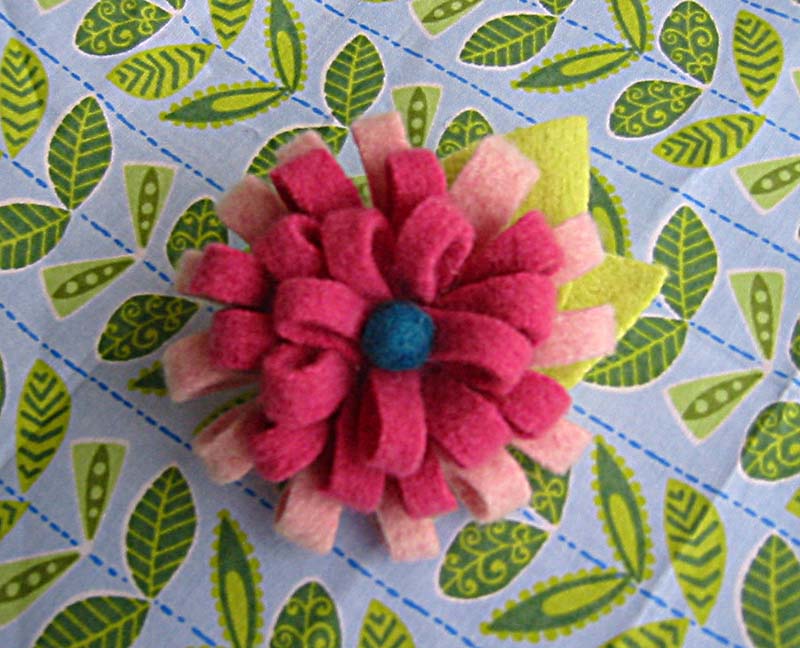
This brooch has the look of a peony or maybe a mum. Perfect for spiffing up a hat, sweater, winter coat, tote bag…you name it.
Materials:
Felted wool scraps
Pin back
Felt ball, bead, or button
Fabric glue
Needle and thread

Start with 2 rectangles, measuring about 3″ x 5″. Fold lengthwise and stitch. Next snip the fold every 3/8″ about 1/4″ from your stitch line.

Start rolling it up, basting near the raw edge as you go.

Now the center is complete.

Take the next rectangle and do the same for the outer petals.

Wrap it around the center and stitch into place, trimming any excess.

Once your flower is complete, it’s time to add the leaves. Make sure to cut the leaf shapes big enough to cover the base of the flower. Baste the first leaf onto the flower base hiding the raw edges for a finished look.
Open the pin back. Snip 2 slits in the second leaf. Pass the pin and latch ends through the slits. Close the pin. While holding the “business end” of the pin, apply fabric glue to the back side of the leaf with the flat back of the pin bar. Press firmly onto the first leaf and allow glue to dry. This technique will give a clean finish to the back while firmly securing the pin.
For the first one I added a felt ball to the center with a dab of fabric glue, but stitching a great vintage button in the center is nice too!

You can experiment with different findings as well. These can be stitched on to a hair elastic or barrette. If you make one of these, please send me a photo!
very sweet!
I love this!
you are so creative. Thanks for sharing the pattern.
So cute! I’m going to have to try this!
Love your blog!
I love it! If this is the kind of projects that will be in the book, it’s sure to be a winner!!
Ooh! Very pretty. Thank you.
I love, love, love, LOVE this idea! Did I mention I love it? 🙂 Thanks!
Oh thank you so much for this little tutorial!! I craft with a lot of felt and can’t bear to toss even the smallest of scraps – and now I have a reason to use them 🙂
Followed the link from whipup.
Your photos are gorgeous and I love the tutorial. I will enjoy reading your blog from now on!
This is a great tutorial, really easy to follow! I’ve added it at http://emptypurse.wordpress.com/
on the “how-to” links page, come see 🙂
Holy cute batman! Thank you for sharing – I totally want to run and felt up some of my sweaters! Can’t wait til your book hits the stores!
Thanks so much for sharing this! I will be trying it for sure. I love your blog too!
THIS IS AMAZING!
LOVE IT!!
can you show the picture of the base please? just want to know how does it look like…
thanks so much!!
That is so adorable. I can’t wait to try it.
Oooohh, these are lovely. Thank you so much for posting directions on how to make. Looking forward to the book, you are so creative!
that is lovely – I really appreciate Blog Land. what a fantastic place to find new inspiration! Thank you
Fantastic tutorial, you are great at doing these. It’s so adorable, I even love the base before it’s covered up! Wonderful work as usual.
great project & tutorial…man….the ideas for felt are endless.
p.s. nice use of the vintage button:)
Wow these are mighty cute. I might have to try this someday.
thanks for sharing your great style with us…looks like a nice weekend project
Great tutorial thanks.They are so quick and fun to do.
How cute!
I will make it. Thank you for your tutorial.
Brilliant tutorial! Thanks so much. Made two on the weekend. Will link pics soon. Thanks again.
Lindo… lindo!
Obrigada pelo tutorial.
Amei o blog!
Margot/Brasil
Thanks for the tutorial – I gave it a whirl. http://domesticali.blogspot.com/2007/01/see-one-do-one-teach-one.html
Thanks for the tutorial!
I’m delurking to ask about sewing machines. I don’t sew, but want to learn how. I’ve heard the advice that you should buy the best (which usually means most expensive) machine to learn on so it’s easy for you. I don’t want to do that unless I find I really want to sew. I have an old Singer “full zig-zag free arm” machine, model 1022. Is this type of machine sufficient to sew felted wool? I am so dying to learn to sew!!!
Thanks, I have the faintest feeling I’ll be back a lot to check out your tutorials as I learn to get over my fear of my sewing machine!
Thank you for that sweet project. I am going to try that one for sure!
That is adorable. I was sent over this way by Ali from Domesticali.
I have to make one of these for my mum. Have been promosing her a brooch for the past few months.
Thanks for the tutorial!
I am delighted to have been sent your way from Maize’s Diary – you have a gorgeous site and I’ve been enjoying it…
And it feels very serendipitous to have found you today of all days. I literally had just made my first little felted bead – and was looking at it thinking “that’s cute. Now what do I do with it???” So this source of inspiration came at the perfect time…
Thank You!
ooh thanks for sharing! i will definately have leftover stuff. this is perfect!!
Thank you for this lovely project.
I will try it for sure!
How very clever! Think I might have to make one of these! Thanks for sharing.
Your flower is so pretty! And your tutorial is easy to follow…thank you for both!
Thank you very much for sharing the pattern, they are very very nice! I have done some… if you want to take a look…
http://cocoricoo.canalblog.com
I love your blog! And I’m waiting for your book!!
Thank you very much for this tutorial!
Olá. Muito bonita a flor. Parabéns
Hi.Very nice flower. Congratulations.
I am from Portugal and i saw your blog. You can see my own blog on
http://bijuthings.blogspot.com/
I hope you like such as i liked yours.
Kisses
P.s. Sorry my bad english 🙂
Dora
Hello,
I’m french, I live in paris and I have a blog (http://tutoriels-loisirs-creatifs.over-blog. com). So, in this blog, i make a list of tutorials i find on the web. To illustrate my notes, are you agree if i take your photos?
thanks
Have a good day
Marjorie
Oh, my! This is way too cuuute!
Olá!
Que lindo seu blog.Amei esta flor…obrigada pelo tutorial.
Bjos,Nena
nanah said:
So simple and so beautiful!
I’m Portuguese, I live in Aveiro and I have a blog too. (artedananah.blogspot.com)
In my blog I show my projects,some for the school where I work, other to sell.
Thanks for sharing your ideas.
Ahhh!!! Thanks SO much for this tutorial!!! I’ve been looking EVERYWHERE for a cute brooch idea and this is it! Thanks a million!!!
-Abby
http://www.projectsforyournest.blogspot.com
Okay, that is seriously one of the CUTEST things I have EVER seen!! I just happened upon your blog through another craft blog that I “stalk” and have to say that I’ve found a new favorite!!!! I have never, ever played with felt but now I can’t wait to try!! Thanks so much for teaching the world your craftiness!!!
Hello!!
amei a flor, grata por compartilhar
bjs
Thanks for the great tutorial. These are so quick and easy to make, but look fab! I made one to attach to the front of a birthday card. It’s not a great photo but it’s here if you want to see it. Cheers!
Hi Betz,
I made a couple of these as Christmas gifts. Here’s a link–
http://fabricpaperthread.blogspot.com/2009/01/felt-flower-brooch.html
Thanks so much,
Lorrie
Thank you for sharing this tutorial. I made a few flowers and they look beautiful.
Warm regards from Romania.
Thank you for the tutorial on the flowers!!! They are adorable, and I will definitely be trying that with all my wool scraps!
MaryLynne
woolonthebrain.blogspot.com
Thank you for lovely tutorial!
best regards from Belarus! ))
A little present for you in my blog
http://manitasdecalabacina.blogspot.com
I love this tutorial, simple and straight forward! Thank you so much.
Here is my finished flower –
http://jedi-gemstone.deviantart.com/art/Felt-Flower-130360583
Keep up the fabulous work ^_^
LOVE this! We’ll be linking!
What a great way to make a package sing.
Your work is inspirational, thanks for sharing your tutorial, here is my flower! http://itsnotwhereyourefrom.blogspot.com/2010/01/happy-new-year.html
Muito legal esta florzinha em feltro. Você postou tempos atrás um outro modelo em feltro que já fiz umas quantas e ADOREI o resultado. Pode conferir meus saches de coração no meu blog.
Brigadúuuuuuu por disponilizar a todas nós atistas tantas idéias interessantes e proveitosas.
bjus
Very cute! This is a twist on the ones I’ve seen before. Thanks for sharing! I’ve posted a link.
Good and very easy steps to do, Keep it up. From http://www.deccansojourn.com
This is such a great flower and tutorial. I’ve featured and linked to it in a Flower Roundup on my blog: http://kinzieskreations.blogspot.com/2010/11/diy-flower-roundup.html
wow this is really great, thanks for the tutoral!
great tutorial, i’ll try to make it! follow me on http://www.fantafeltro.blogspot.com! 🙂
You make it look so easy and simple. Thanks for sharing.
Thanks for this….I shared it also on my facebook….deb
The brooch is very cute. But first of all, I fell in love with the fabric behind. Does anybody know, where to find it? I would love to buy a meter….
Please, please, let me know! [email protected]
Thanx in advance and greetings from Germany!
Verena