This week my kindergartener put on his favorite Old Navy Halloween shirt from 2 years ago. Yup, it was looking a little shrimpy on him. Three-quarter length sleeves don’t really work for boys. I let him wear it once and then decided to do a little wardrobe refashion on it.

That’s it on the right, a size 4T. The shirt on the left is a different brand, but also a 4T and close to the same fit. I decided to sacrifice the also-outgrown Batman shirt to save the Halloween shirt. (Shhh…don’t tell my oldest!) My plan was to make a mock layered look by combining the two shirts.

First I used a short sleeved shirt as a guide for cutting the sleeve off. I wanted a reference for not only length, but for angle of the cut. I aligned the armholes then cut off the green sleeve, adding about an inch extra for seaming and hemming.

Then I placed the cut off sleeve on top of the other sleeve as a a reference and cut the second sleeve off to match.

I placed the green Halloween shirt and the cut off sleeve on top of the gray shirt. I knew from the last wearing , that the new sleeves need to be at least 2 inches longer. I lined up the cuffs and eyeballed the space: 2 inches of gray sleeve length, plus 1 inch for seaming and hemming. Fortunately the width of the grey sleeve is about the same width as the the green shirt. I cut the gray sleeve off following the edge of the the new short sleeve. Then I copied the length to cut off the second gray sleeve.

Next, I turned the green shirt inside out and put the cut off gray long sleeve inside, right sides together. I lined up the underarm seams and pinned the sleeve edges together distributing the fabric evenly around.

I sewed them together then pulled the sleeve out and pressed the seam allowance (1/4″) up toward the green part of the sleeve.

Here’s the sleeve right side out. Look, ma, longer sleeves! Ok, now to create the mock layered part.

I folded the gray part back inside the green sleeve and pinned it in place. Then I stitched twice around the opening, about a half inch from the fold, to give it the look of a hem.

I pulled the sleeve back out and pressed.

Now for the shirt tail extension. I placed the green shirt on top of the gray one and flipped the hem up out of the way. Again, I eyeballed about a 2 inch-plus extension and cut the bottom off the gray shirt.
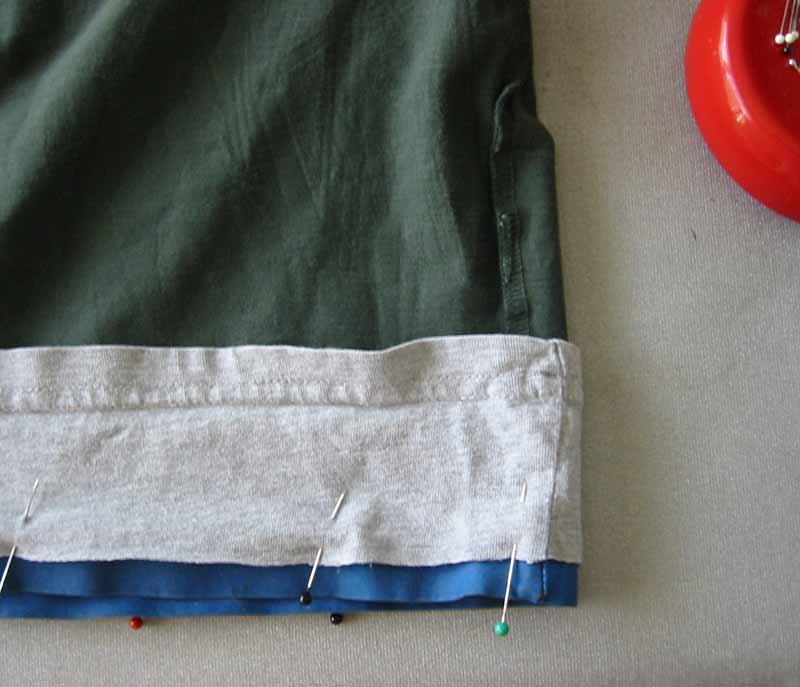
Here is the green shirt inside out with the gray strip/tube/hem around it, wrong sides together. I aligned the edge of the gray part with the original hem stitching on the green shirt and sewed them together right on top of it to hide my stitching.

I flipped the new shirt tail hem down and turned the shirt right side out. Ta da! The 4T grew to a size 6!

Now, my guy is happy to wear his fave shirt again! However, I’m told I “shoulda made a hood”. There would probably be enough fabric from the body of the gray shirt, except for negotiating around that batman logo. I was also concerned about restricting the stretch of the neckline when sewing the hood on, thereby making the neck opening too tight. Nothing worse that losing a few ears when you pull your shirt off. (although I suppose it would add to the Halloween theme. eeew, sorry…) Not the best pose here for showing off the sleeves…oh well! 🙂
For other fun refashioning looks, check out wardrobe refashion and the etsy shop dress me.
What a cute idea–and even cuter picture!
Clever and cool! My son had a growth spurt so this gives me some great ideas not too mention it will help me with my Wardrobe Refashion pledge. Thanks for sharing!
what a great idea! Very cute.
Wow – that’s very cool!
that is a fantastic idea. It looks like you did a great job on it. It’s hard for the little ones to let go of their favorite shirts. and it’s wonderful that your son appreciates it.
THAT is the best idea I have seen in a long while!
Great job, mom! They do become very attached to things.
Love it! You are the cleverest!
great job!!! Love it!
Nice job! I can see that your boy is very happy with his refashioned shirt!
What an incredible idea! Thank you for sharing that. 🙂
You are so good Betz, THAT is a great idea!
How clever!!!!! I am really impressed:D
That is such a good idea! My daughter has a couple of shirts that are too small so I might do this too!
That’s briliant! I never need to throw anything out again :o) Thanks for sharing. I now need to rifle through some drawers to try it out for myself. Great instructions xxx
That is a great idea! Thanks for sharing!
This is a great idea!
Thanks for that – the instructions were really clear and the result is fantastic! I can see there being some very happy children! Lucy x
Super idée!!! merci pour les explications.. thank you!!
“shoulda made a hood”. Oh, I love that!
The shirt looks fabulous. What a great idea!
Awesome idea!! I am going to share it with my friends.
That has got to be one of the coolest ideas I have seen in awhile! Oh and great directions and pics.
Clever.
that’s brilliant and it looks great too!
Fabulous idea and even better tutorial. My son has been lamenting the loss of a few favorite shirts. I can’t wait to surprise him with a few of them remixed.
Thanks for sharing with us!
Wow, what a great idea! I’m going to try to salvage some of the shirts my bigger boys have discarded because they are too short!
I am going to have to do this with “Thomas”!!!
Hi I did almost the same thing before I came across your refashion today. What a coincidence! It’s great and fun to refashion isn’t it? Here’re my DD’s refashioned Ts (sorry you’ll have to scroll down. I should have separated them in different posts): http://sewlovesew.blogspot.com/2008/06/some-stuff-made-today.html
Great idea! I’m not a sewer (I was referred her because of an interest in working with felted wool), so this is well beyond what I could do.
What I did with a fav t-shirt of my kidlet’s was to cut out the graphic (in this case: Miss Drama Queen), do a blanket stitch around the edges and safety-pinned it to the back of her jean jacket. We can change them around and it means the jacket remains gender-neutral for passing onto friends with boy kidlets.
This is such a really neat idea. Thanks for sharing!
I also have a child who has favorites like this. This is a great idea especially in these tough times. I’m not a sewer, but I am going to try this. I don’t feel I can mess up too bad, LOL!! I’m actually looking forward to trying this trick. THANKS!
Thank you for this tutorial. I just refashioned a size 4 spiderman pajama top into a size 6 t-shirt that my daughter can now wear school.
And I have to say, even though I’m sure you’ve heard it many times, I love those cupcake pincushions. I just ordered your book and purchased 4 thrift sweaters (felted and drying as we speak). Can’t wait to get the book.
Thank you so much for this great idea.my child always fusses over the fact that his fave shirts have grown ‘smaller’.He’ll be kissing me over n over for making his fave shirt his size again. LOL!
What a coincidence. I find all MY shirts on the short side after they come out of the wash. I have to go through all my shirts that I have boxed up and see what I can salvage.
I love this— I had thought about it in my head, but I didn’t have directions so it was just an idea– now you made it a soon to happen project! yahooo!
Thanks!
Very nice!! Great frugality and creativity!
Awesome! My boys are always outgrowing the length of their shirts so quickly, I think I will try this on a few to see what I can accomplish. (I may even try re-purposing some too-short turtle necks to look layered.)
Thanks for the great tutorial! I just used it to extend the life of one of my son’s shirts and I think I’ll do it to a few more as well.
Great idea! I’m going to use this on my daughter’s favorite t-shirt that has gotten too short on her!
umm…duh! why did i not think of that one? it’s a great idea! i’ll have to try that one next time my 11 yr old complains that i’m taking his “favorite shirt”.
I think I’ll try this for my own knock-around-the-house shirts.