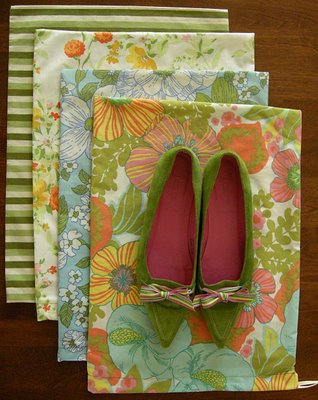
Never having had a sister, it sure was nice of my two brothers to marry some awesome sister-in-laws for me. One thing the three of us SIL’s love (besides my brothers, of course) is shoes. We share similar tastes in footwear as well as the same shoe size. (They even own a pair of these, my faves!)
Kris, of gingersnap fame, is having a birthday this week. For her gift I made a set of shoe bags out of some yummy thrifted sheets. Kris and my brother travel frequently so having these will come in handy for her when it is time to pack for the next trip. Shoe bags keep your clothes clean and your shoes protected and organized!

These are super easy to make and take less than a half yard of fabric each, plus a yard of twill tape for the drawcord.

1) With fabric folded, cut a rectangle about 13″ x 18″. The fold will be the bottom of the bag. About 2 1/2″ below the top edge, make a 1/4″ snip into the one side of the rectangle, through both front and back layers. (metal ruler shown for scale, not to be used with rotary cutter.)

2) Fold the 2 1/2″ area above the snip towards the wrong side and hem. Repeat for the back. (Pay no attention to the lack of continuity with the fabric print!) With right sides together, sew the rest of this side seam and the remaining side seam using a 1/4″ seam allowance.

3) Finish seam allowances by serging or a zigzag stitch. Finish the top edge of the bag while you’re at it.

4) Fold down the top edge of the bag to create the casing. Topstitch around the perimeter of the top of the bag from opening to opening.

5) Cut a yard of twill tape and thread it through the casing using a bodkin or safety pin. Knot ends of tape.

And there you have it! Pop your shoes in, cinch up the drawcord and you’re ready to travel. Please let me know if I omitted anything or if you have questions about making the bags.
(If you’re wondering about the shoes in the photos, they are mine, all mine, and are not part of my sister-in-law’s gift! I love her but I gotta draw the line somewhere.)
Fantabulosa!
Thrifted sheets, really? I love the patterns! Thanks for sharing a great gift idea and the how-to. 🙂
I’ve been making shoe bags as gifts for quite some time…they are always a welcomed gift. I tend to sew mine with french seams so that there are no exposed threads to snag on shoe buckles or the like. Same general idea as you’ve shown, but I start with right sides out and a tiny seam, then flip and enclosed the seam.
Hi WW,
Great suggestion! Wish I had done that. Next time!
Betz
Bezt, Great idea. I’m going to try makeing a few of these for my dancing friends. We never wear our dancing shoes off the dance floor, so we carry these shoes to the dances. I’m sure they will be appreciated.
NancyC
WOW!!
You have done a beatiful gift to your sister-in-law!!
And compliments for your explanations! They are always so clear!!! Thanx!!
Always love reading your blog and ideas but today out of nowhere it was a special treat. One of the thrift store sheets you used were just like the ones my grandma use to have on her bed many moons ago. My grandma has been gone for five years now but what a nice rush of warmth I just got to feel.
Thank you for the tutorial, but I just had to add that the color in those photos is BREATHTAKING. Amazing.
This is beautiful Betz! I would love to photo-link to this tutorial if you didn’t mind!
Great tutorial! I’m in love with those green shoes…
Kisses
Hi, thanks for the tutorial. I always love reading your posts but usually am just a lurker. I love the idea of using sheets for these bags. I have made drawstring bags for years; for the children for special school stuff, special ones (with names on) stuffed with felt pens and a blank pad for long car trips, for storing small toys etc. I call them “anything bags”. A suggestion I have is to use two pieces of cord for them; leave two openings in the top and run one cord from each side. They are so much easier to pull shut with two cords, try it! I often save shoe laces when I throw away worn out sneakers, these are perfect to re-use as draw cords. Happy sewing!
Muchísimas gracias. Está muy bien explicado.
I love that you used “repurposed” material! I have closet full of odd pillow cases that I love the patterns on, but only have one, and can’t bear to part with any of them.
Super idea!
Rebecca
Thanks for the tutorial; it looks easy enough even for a beginner like me. I don’t have any shoes even nearly as cute as yours, and I don’t travel much, but I can see using drawstring bags for so many things I’m going to have to make a couple.
I’m also thinking that I had sheets exactly like one of those floral prints – wow, flashback!
Awesome idea. I’m always throwing them in plastic bags, but this is so much nicer.
Wonderful tutorial thank you so much for sharing with all of us!
Love the idea reuse sheets ect.
Your awesome!
mmmm LOVE these bags! we’ve been making similar bags as a way to hold our holiday gifts… they’re a lovely gift in themselves and they save on paper as they get reused!
fun blog!
xoxo
jul
Awesome! I’m going to have to make some of these, my shoes are all over the place. Could be quite decorative with some wonderful flowery fabrics and all 🙂
Great idea! Thanks!
Hey Betz. I saw this website and thought of you. http://www.spoonflower.com You can print your own fabric! You can use your own design, or maybe reproduce a vintage one you like, all kinds of possibilities. Love the shoe bags;)
Heather
Fabulous idea …once again! How do you find the time to come up with these things? I can barely make it through the day anymore!
Love the shoe bags. I think I will make some for my daughter. She is getting ready for a trip to Arizona…and she can’t decide which shoes she will “need”. It’s always a hassle when the bottoms get on your clothing. Beautiful idea!
Stay Cozy,
Carrie
thank you! I need to make these. Great way to use vintage sheets.
Thank you for the tutorial – great idea! But really where did you get those cute green shoes? It seems like all the shoes i see nowadays have rounded toes – those are perfect!
Very Good idea! I´m making some for my girls.
Célia Cardoso
I love the shoe bags, thanks for the tutorial. I think I’ll make some for my mom, she’s a shoe-a-holic, as well as for myself!
Kim
Happy Birthday to me! The shoe bags are just great, so soft, washable to boot (get it? boot – shoes) and since I didn’t have any they will make me think of you on every future trip. Thank you, thank you! – Your sister-in-law, the birthday girl.
Your works are great but the green shoes are wonderful!!
Kisses
Alessia
Thanks for sharing the shoe bag tutorial. Its a great way to use of fabric. I can’t wait to get started.
Love the bags, great fabric and cool packing idea. Nice shoes too, looks like you customised them yourself 🙂
boa idéia.
Been making these shoe bags for years ~ double the draw cord ~ and I began making them to contain my “unmentionables” while travelling because to my horror, once on a return trip home, my luggage was searched ~ dirty drawers strewn about and such! EEEEE GADS! Anyway, now not only are “they” contained but my shoes as well!
Hello! I am looking to hire somoene to create 40-45 of these darling shoe bags to use as welcome gift bags for my out of town wedding guests. As “easy” as these look, I don’t even own a sewing machine! If you are interested in this project, please send me an email at [email protected] to discuss the details.
Thanks so much!
Love it! Thanks for sharing. I’ll try it this weekend with my scrap fabric. Wish I had a serger to make it look lovely and finished, though. Oh, and Gina, that’s a super cute idea for your wedding guests. Hope you find someone!
oh would that i had the time (and the sewing machine) needed to make these darling bags. my shoes would be so grateful…
I’m not really much of a shoe girl but being a knitter I knew instantly that these would make great project bags. (So much nicer than plastic!) I’ve finally whipped up a few large enough for a sweater project and I’m planning to do many more in assorted sizes. Thanks so much for the great tutorial!
http://stoneview.typepad.com/stoneview/2009/06/project-bags.html
LOVE it! I’ll be linking!
Just found your blog and I’m super excited for this tutorial! My wonderful SIL is getting married in April and I’ve gotten the bridesmaids gifts to take care of! Since this is a destination wedding, I’m sure all the girls would love one of these to keep our pretty shoes from messing up our fabulous dresses!
Thank You! : )
You’re a gem! I’m going upstairs right this minute to whip up a couple of these for Christmas gifts. You rock.
Thank you 🙂
Lee-Anne
I just made 3 of these and they are so lovely and a great beginner project! Thank you so much for posting these!
Loved the tut, – will def make some!
And the way you write is pure joy!!
Best regards from Eva Mari in Norway
Hi!
I just used your tutorial to sew a smaller insulated version for my daughter to use as a hair straightener cozy. Your instructions and pictures were EXTREMELY helpful.
Thanks!
Love this tutorial. Plan to make them soon for gifts! Gave you a shout out on my latest post!
thanks for this awesome tutorial betz!
after my friend gave me a set for my birthday, I knew they would be the perfect gifts for two of my friends. I just finished making 6 today! love them! following lisa’s lead, I used french seams making my cuts 14×20. can’t wait for my friends to open their shoe bags at Christmas. what a blessing this was!!
this is a great idea!
I have included it in my Christmas Gifts To Sew round up
http://jojoebi.blogspot.com/2010/10/lots-of-gifts-to-sew.html
thanks
jo
I blog about this here – http://emilyflippinmaruna.wordpress.com/2011/04/03/make-make-monday-vintage-sheets-upcycled/
Love your tutorial! I’ve made a few bags following your fantastic instructions, and then made a couple special ones for some leather Fluevog’s that needed an interior wrap to protect them from rubbing against each other.
See it here:
http://www.flickr.com/photos/birdandbicycle/sets/72157626432428406/
birdandbicycle.wordpress.com/
Love it! I made myself a set of 6 bags, all coordinating. I have them posted on my FB page and not my blog or flick’r. Sorry. But I love ’em!
Great idea! Where did you get those gorgeous green shoes?
I make shoe bags as well for gifts. I agree with the poster who suggested using 2 cords. In addition I like to stitch down the middle of the bag so that the shoes don’t scuff each other up. Have a “sleeve” for each shoe. Whenever I have given these as gifts, my recipients have loved them.
These sound wonderful and easy. I’m going to give it a try. Thanks for the shoe bag tutorial.